Professional Electronic In/Out Board
|
Chapter 4 - Advanced Staffinder Features
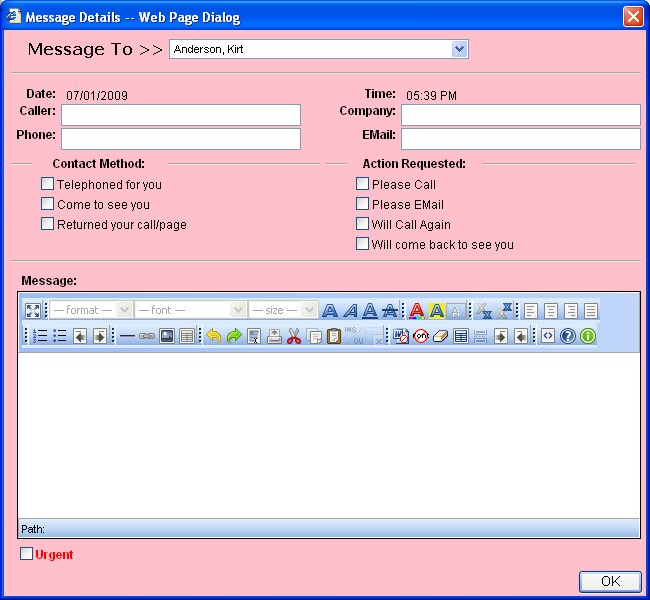
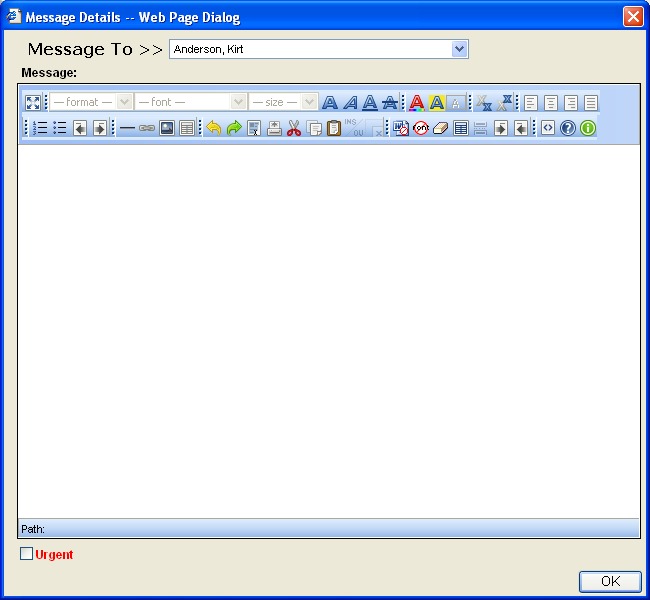
One major feature in Staffinder is the ability to send messages to other employees. After you determine another employee is away from the office, the next step might be to send some information about a visitor or caller. Not to be confused with an e-mail system, Staffinder allows users to send "While You Were Out" messages to other employees, replacing the standard form typically available in pad form. Message recipients can view, save and delete messages as needed. There are 2 different types of messages. Staffinder has created a duplicate version of the common "While you were out" message that offices commonly use. The second is a custom message that can be sent pertaining to just about anything. Both messages support HTML formatting in the message body. You can change the font, colors, sizes and bulleting if needed. To send a message to another employee, either:
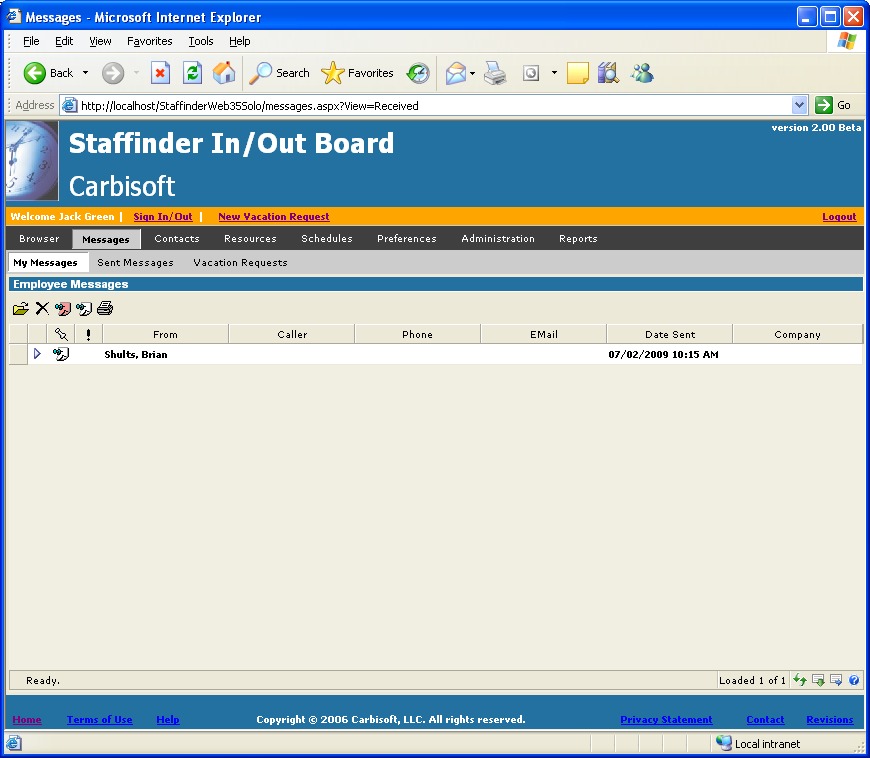
Receiving Messages: Sent Messages: You can also view the messages that you have sent to others. You can delete them or edit them as well but keep in mind that this is the actual message so deleting it will remove it from the other persons inbox. Vacation Requests: Vacation Request are only received by vacation managers and require approval or disapproval. This is covered in chapter 2 of this manual. Deleting Messages: Here are the 2 methods of deleting a message:
Note: When reading messages, it may appear that you can edit them. However this is not the case. Any data you change in a message sent to you will not be saved. Replying to Messages:
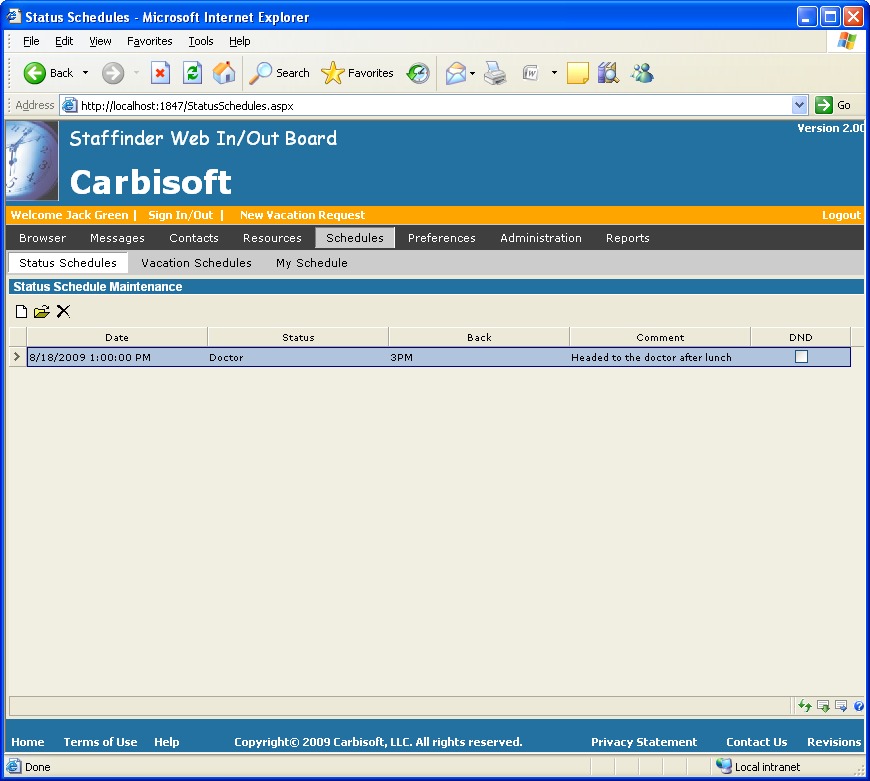
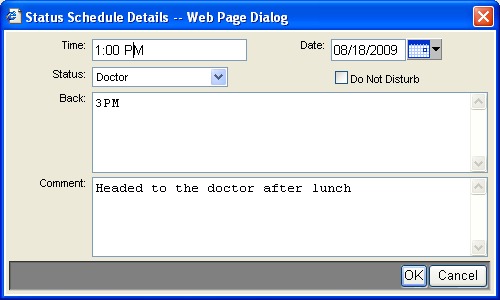
The Status Scheduler will give you the ability to schedule future status changes. You must have installed the Status Scheduler Service in order for this to work (or be using the hosted version). You may schedule as many as you like and your status will be updated accordingly. With this feature you will be able to setup your daily schedule in the event you will be out of the office. You can view your schedules via the Schedules menu. The Scheduler Service will monitor your entries and change your status at the appropriate time. Once a schedule has been activated it will automatically be removed from the system. To add a schedule:
Modify an existing schedule:
Delete a schedule:
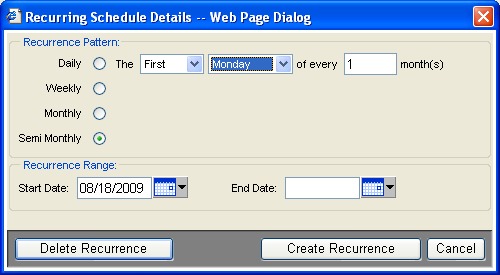
If you have a regularly scheduled event or meeting that happens at the same time each week or on a specific day you have the ability to create the event once and have it automatically schedule it for all future days. This applies to both the resource and the personal schedulers. Creating a Recurring Schedule: To create a recurring schedule click the Recurrence button at the bottom of the schedule details screen from either the Resource Schedule or the Personal Schedule screen. The Recurrence schedule screen will be displayed as shown in figure 3.9. Select the correct recurrence schedule for the event and click the Create Recurrence button. Once the Recurring schedule has been created the Recurrence button on the schedule details screen will change to Red letters. The start date is required and can be any date you choose. All schedules will begin on the start date and continue until the end date. Leave the end date blank to have the schedule continue indefinitely. NOTE: If you browse the events into the future you will find that the recurring schedules will only be displayed up to one year in the future. They will continue to occur but for performance reasons we only forecast out one year. Deleting a Recurring Schedule: To delete a recurring schedule click the Delete Recurrence button at the bottom of the recurrence details screen.
When we were developing Staffinder we wanted to allow the ability to add custom menu selections so companies can add links to their important intranet sites or applications. You now have the ability to modify the navigation menu to suit your needs. If you remove any of the built in menus then you will loose that functionality. If you open the file Site.Master in the Staffinder web root with notepad or your favorite HTML editor and scroll down near the bottom of the file you will see all the menus (MenuItem Tags) laid out in a parent child relationship. The parent menu must have a couple properties set to determine its availability to the users. Menus do not require a child in order to function so if you only need one item you can set the URL property on the parent and no child menus will be required. Below we lay out the properties and their meaning. Menu Item Properties: Here is an example of how a menu should be laid out... <asp:MenuItem Text="Messages" Value="Messages" Selectable="False"> <asp:MenuItem NavigateUrl="messages.aspx?View=Received" Text="My Messages"Value="MyMessages"></asp:MenuItem> <asp:MenuItem NavigateUrl="messages.aspx?View=Sent"Text="Sent Messages" Value="SentMessages"></asp:MenuItem> <asp:MenuItem NavigateUrl="Requests.aspx" Text="Vacation Requests"Value="VacationRequests"></asp:MenuItem> </asp:MenuItem> Single level menu: <asp:MenuItem Text="Internal Applications" Value="InternalStuff" NavigateUrl="http://www.mysite.com/our_stuff.htm"></asp:MenuItem> 2 level menu: <asp:MenuItem Text="Internal Applications" Value="InternalStuff" Selectable="False"> <asp:MenuItem Text="Trouble Tickets" Value="TroubleTickets" NavigateUrl="http://www.mysite.com/trouble_tickets.htm"></asp:MenuItem> </asp:MenuItem>
We have included a few color schemes to choose from but in the event you wish to create additional color schemes we have given you the ability to create or modify the various theme files. The color schemes are defined in CSS (Cascading Style Sheets) files located in the "themes" directory under the Staffinder web root. You can copy one of the existing files and change it to suit your needs. If you need help just email our support department and we will be glad to help. If your running the hosted version we will be glad to create the scheme if you let us know what colors you prefer.
As with most web applications you have the ability to change some of the internal workings of the application. Below we have listed some of the things that you can do to modify Staffinder Web and further integrate it within your organization. We will add to this list as we further enhance the program. Logo: You can change the logo on the upper left corner of the banner by updating the file (logos/Logo.jpg). We recommend you resize the Logo as small as possible so you don't take away the screen area from the application. |
||||||