|
Index |
Chapter 1 |
Chapter 2 |
Chapter 3 |
Chapter 4 |
Chapter 5 |
Chapter 6
Chapter 1 - Getting Started with Staffinder
Depending on how Staffinder was installed,
it may automatically start when your workstation is started. If Staffinder
needs to be started manually or you accidentally close it, here is how
to start Staffinder.
You can start Staffinder by clicking
Start > Programs > Staffinder. You can quickly create a Shortcut
on your desktop by right-clicking the Staffinder entry and dragging it
to the desktop and releasing the mouse button. When the pop-up menu
appears, select Copy Here.
If Staffinder does not start automatically
when your workstation is started, contact your system administrator to
make adjustments to your Windows Startup folder.
Depending on how Staffinder is configured,
you will either be taken directly to the Staffinder interface, Staffinder
will run minimized, or the log in screen will appear.
When you start Staffinder, you may be asked
to log in by providing your user name and password. Below
is the screen you will use to provide this information. (Figure 1.1)
To log into Staffinder:
-
If you have a large
number of employees in Staffinder, you may find it easier to locate
your name in the list by selecting your department from the Dept/Group
drop down list.
-
Click your name in the
Employees box.
-
Enter your password
in the yellow Password box. Your password
is set to your first name when your account is created.
It is case-sensitive, so if your name is "Betty", your password
is set to "Betty" by default. We recommend you change your
password after your first successful login, this will keep other
people from logging in under your account. To change your password,
click the Security icon on the toolbar or click Tools <
Security.
-
Click OK or press
Enter to log in.
Note:
If you are the only user who uses the computer, you may want Staffinder
to log you in automatically. To change this setting, click
View > Preferences. On the Options/Refresh tab, uncheck
the "Prompt for user name at startup"

Figure 1.1
We believe that a program's interface should
be simple and easy to navigate. This concept means following the standards of other
popular programs that you are probably already using. In many cases,
we have made two or three ways to accomplish the same task. We also
activated the right mouse button whenever it made sense. Below is
the Staffinder main screen followed with explanations that describe the main parts
of the interface.
Figure 1.2
Ribbon Bar:
The Ribbon Bar is the main navigation element and contains the Orb,
Quick Access Toolbar, and Tab Menus. If your familiar with Office
2007 then you have seen this new interface element and understand how
it works.

Figure 1.3
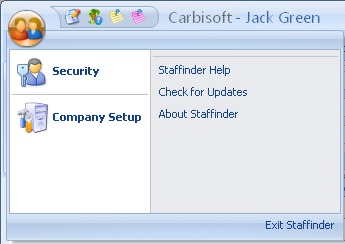
Orb Menu:
The Orb Menu provides access to some important features in
Staffinder. Clicking on the Orb will display the menu in figure 1.4.

Figure 1.4
Security:
Displays the security dialog so you can set your status
security.
Company Setup:
Displays the Company setup screen where you manage the
administrator features of Staffinder.
Staffinder Help:
Brings up this help from within the application.
Check for Updates:
Launches the Web Update utility for installing updates that may be
available.
About Staffinder:
Brings up the About box with version information.
Quick Access Toolbar:
The QAT provides access to common functions in Staffinder to make
them easy to get to. Refer to figure 1.5.

Figure 1.5
Button 1 - Sign In/Out:
This button brings up the Sign In/Out screen.
Button 2 - Vacation Request:
This button brings up the Vacation Request screen where you
submit a vacation request.
Button 3 - Custom Message:
This button brings up the Message Details screen where you can
send a custom message to someone.
Button 4 - Phone Message:
This button brings up the Phone Message Details screen where
you can send a phone message to someone.
Navigation Tabs:
The Tabs provide access to the various areas in Staffinder.

Figure 1.6
Index |
Chapter 1 |
Chapter 2 |
Chapter 3 |
Chapter 4 |
Chapter 5 |
Chapter 6
|


