Professional Electronic In/Out Board
We believe that your experience with a program starts with the
installation. In looking at other programs, we have dismissed many
of them because the installation either didn't work or gave us
trouble. That being said, we have tried to make the installation of
Staffinder as painless as possible. We believe simple is better and
to over-document rather than assume you know what we're thinking.
This document covers the installation procedures for the
following Staffinder products...
Staffinder Client
Staffinder Web
Staffinder Client can be run in two different scenarios, either
Network or Standalone. Here is the
difference in these scenarios:
Network: Use Network when the Staffinder data is to be located on your network server so your employee workstations can connect to it and use the data. In most cases, the Network scenario is the right choice.
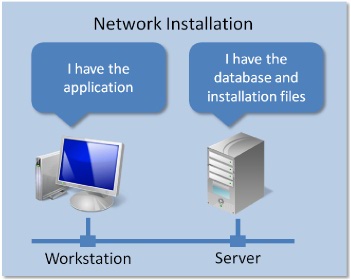
Standalone: Use Standalone when you want the data and the program to be used ON THE SAME COMPUTER. For example, your employees do not all have computers, but you want a receptionist to use the program to track employees whereabouts. In this case, the program is completely installed on the receptionist's PC and he/she is the only person using it. This mode can be used even if the receptionist is on a network.

General Installation Information:
The installation is done in two steps no matter if you're doing a Network or Standalone installation type. Step one gets the files extracted out of the downloaded file (setup.exe) and creates an install point for step two. Step two puts the executable program on the workstation and configures the program by creating Registry settings.
In a network installation, all employees must have READ/WRITE access to the folder where the Staffinder database is installed
Setup Procedure:
Step 1: (Server
Installation) Run this from any workstation on the network
Double-click the StaffinderClient5.0.msi (or Setup.exe) file you received in your download.
At the "Welcome" screen, click NEXT.
At the "Choose
Destination Location" screen, use the Browse button to select
the desired drive letter to install the workstation installation
point and database. The installation will automatically add the
StaffinderClient (StaffinderEE for enterprise) folder to your
selection.
Network Installation Example:
If you're installing the program as a multi user program, you
will select a network drive like "f:\programs". Since Staffinder
automatically creates "StaffinderClient" folder, your files would be
extracted to "f:\programs\StaffinderClient" in this example.
Standalone Installation Example: If you're
installing the program on one machine for a receptionist, you
will select a location on the local hard drive like "c:\". Since
Staffinder automatically creates "StaffinderClient" folder, your
files would be extracted to "c:\program files\StaffinderClient" in
this example.
At the "Start Installation" screen, click NEXT. Files will be copied to the location you selected in step 3.
At the "Finish Installation" screen, click FINISH.
Step 2: (Client Installation) Run this each employee workstation
Locate the drive and folder that was chosen during Step 1 of the installation.
Double-click ClientSetup.msi.
At the "Welcome" screen, click NEXT.
At the "Choose Installation Type" select the type of client this will be. If this person will need to perform administrator duties on the database then choose Admin. For standard clients choose Standard Client. If you are installing the Enterprise Edition for the first time and will be performing the configuration you will need to choose Admin. This will install the configuration utility needed to complete the installation.
Select the Icon placement locations. Check the "Add Staffinder to the Startup Folder" if you want Staffinder to start automatically when the computer is booted. This is highly recommended.
At the "Select
Installation Folder" screen, use the Browse button to select the
desired drive letter to install the program to.
Standalone Installation Example:
If you're installing the program on one machine for a
receptionist you will select the same directory you created
above.
Note: Even though you can install the Staffinder
client on a network drive, we recommend installing the program
on the local drive of your workstations.
At the "Confirm Installation" screen, click NEXT to start the file installation.
At the "Installation Complete" screen, click FINISH.
Step 3: Creating the Database
First you will need
to create the SQL Server database. Run the Database Configuration
Utility from the start menu. This icon will only exist if you
installed the client and selected "Administrator" during the
installation. Refer to Figure 1.
If you wish to create the
database manually instead of using the Database Configuration
Utility we have included several scripts to build the database in
the server setup directory. The files (tables.sql and the 3
viewX.sql) are located in the server directory where you installed
the server portion of Staffinder. There will also be a help file
with the installation steps needed to manually setup the database.
Your DBA should know what to do. You will still need to run the
Database Configuration Utility to create the user account and the
configuration file for the clients. See the Create User
Account below on how to do this.
Create Database:
When the Database Configuration Utility starts click the "Create
a new database" button.
You will need to provide the following information.
Server Name - This is the name of the server where SQL Server is installed.
Database Name - This is the name of the database. We have defaulted this to StaffinderEE. You can choose any name you like though.
Admin User Name - This is an Admin login Id that will be needed in order to create the database. SQL Server uses a system ID called "sa". This is only used for the creation of the database and will not be used at any time other than this process. You will most likely need to contact your DBA in order to get this information.
Password - This is the password for the login ID used above.
Click the Create Database button and your database will be created.
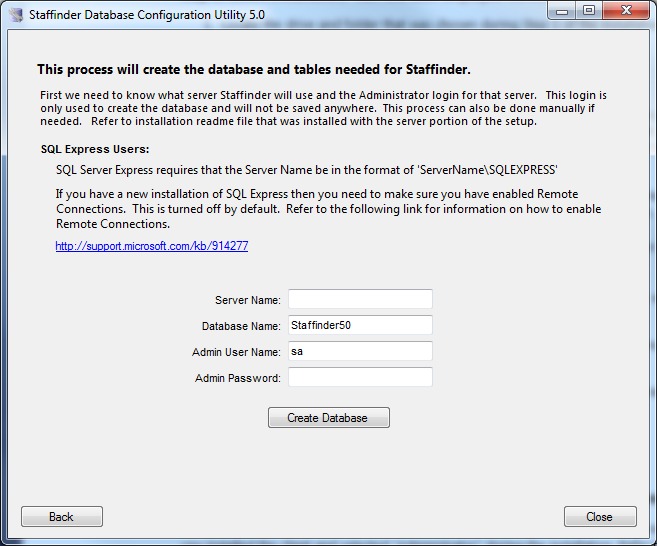
Figure 1
Create User Account:
This
step will create the user account that Staffinder will use to log
into the database. Refer to Figure 2
We will need the same
Admin user account that was used to create the database. If you have
just finished creating the database these will already be known and
provided for you.
Server Name - This is the name of the server where SQL is installed.
Database Name - This is the name of the database. We have defaulted this to StaffinderEE. You can choose any name you like.
Admin User Name - This is an Admin login Id that will be needed in order to create the database. SQL Server uses a system ID called "sa". This is only used for the creation of the database and will not be used at any time other than this process.
Password - This is the password for the "sa" login or whatever login you are using.
User Account Name - This is the name for the login account that you will be creating. Most companies have some standard naming so ask your DBA if your not sure.
Account Password - This is the password for the new user account.
Click the Create User Account and you're done.
NOTE: If your upgrading from a previous version and need to import your data please refer to the upgrade instructions here.
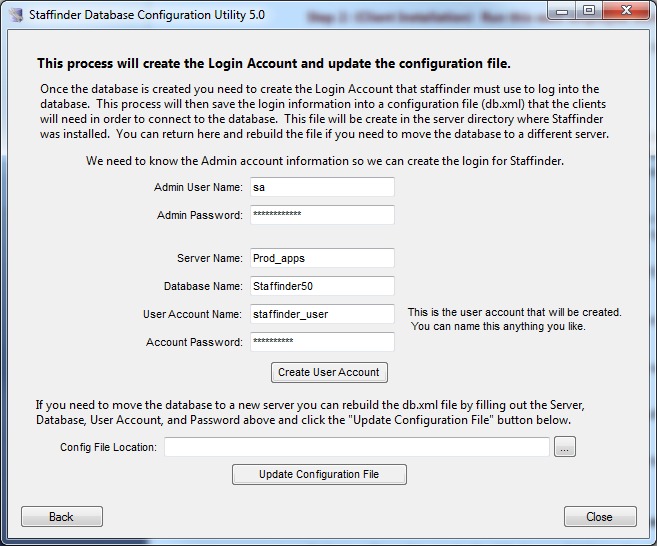
Figure 2